
DRAWING TIPS – USE REFERENCES
Using photos / pictures as reference is very useful to learn about anatomy, the differences of species / breeds / body shapes, fur, details, animal behaviour, etc.). While photos are good, it’s also much recommended to look at videos or live animals to understand how a body moves. Collect and use those references and save them into a folder (it saves time to already have a nice selection at hand when you need it).
If you’re saving artwork of other artists as reference or inspiration, that’s fine. Just make sure you’re not just copying someone else’s artwork. There’s sometimes a fine line between inspiration, and copying.
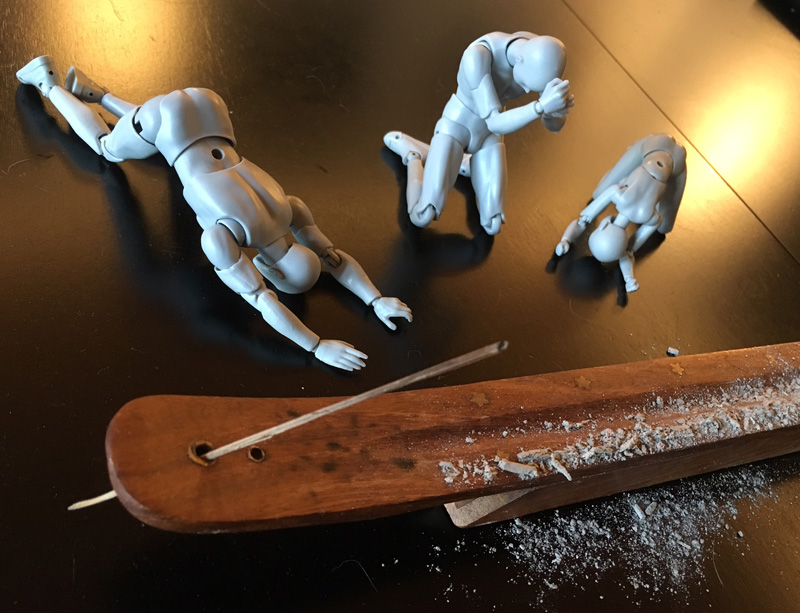
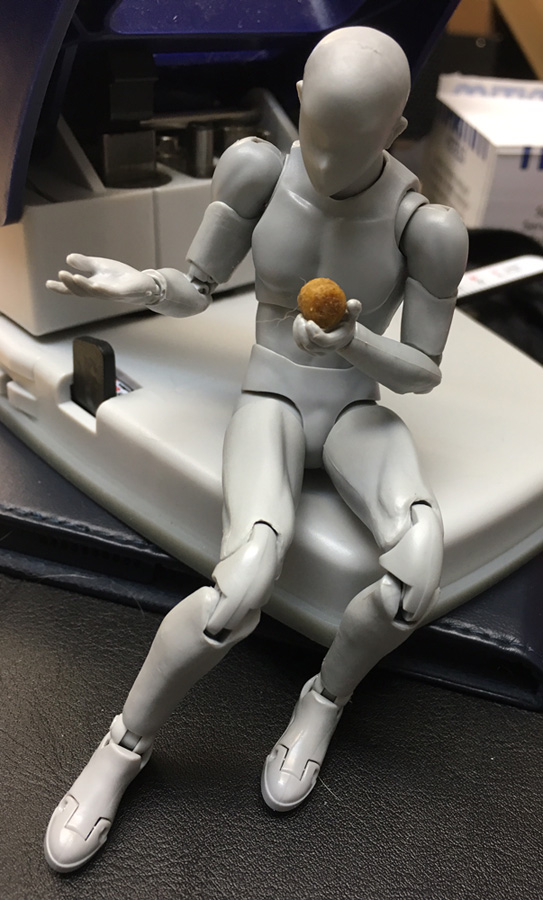
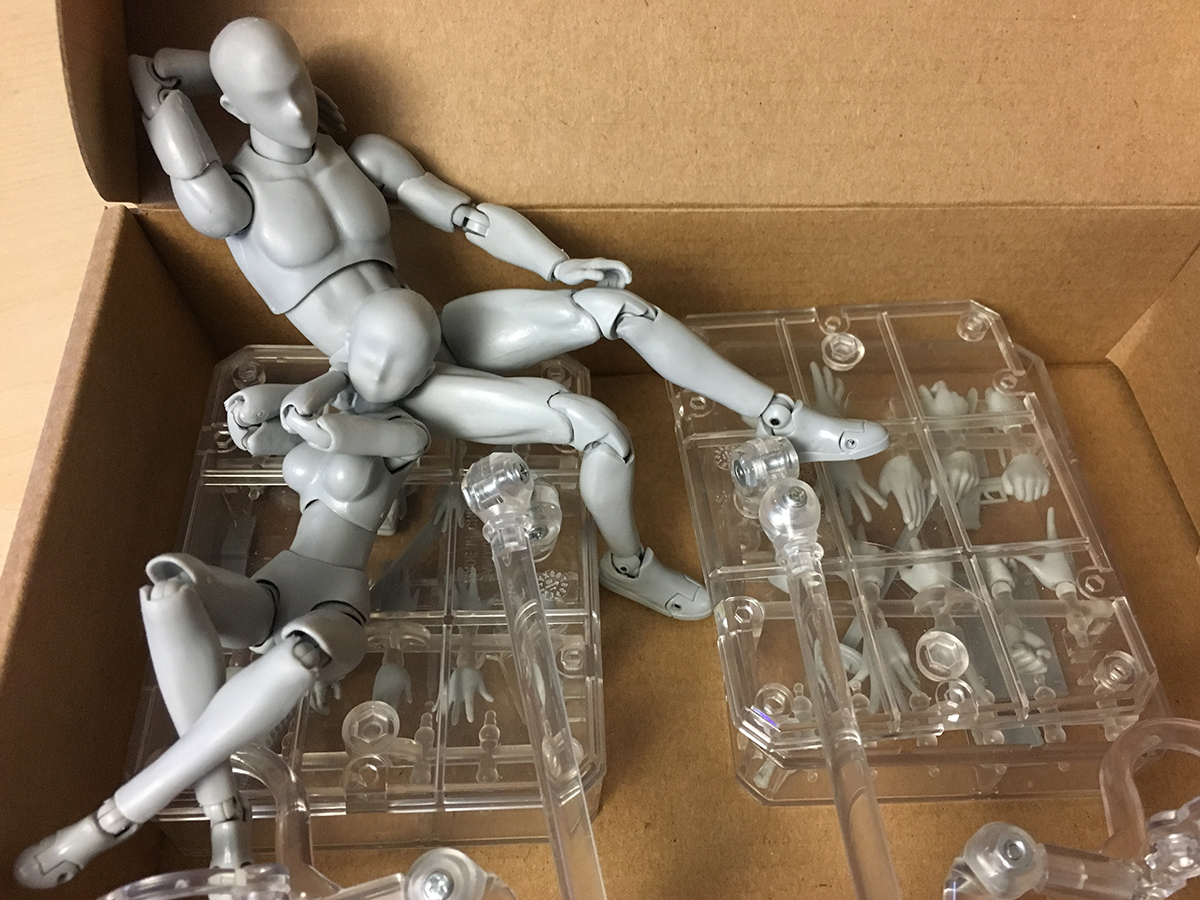
If you’re looking for poses, these the posable figures made by S.H. Figuarts are a nice little helper. You can play with them to get ideas for a pose (one figure or several ones for interacting), or use them as help to get perpective or lighting right.
There is a male and a female version, both coming with a selection of hands (different poses) and accessories (sword, weapon, laptop, phone, pen…), as well as a nice box to store the little items in. There are a lot of more figures (different versions and colors) too.
The box (where you can store the hands and items in) is, at the same time, the stand base for the triple jointed arm, which you can use for holding up your figurine for different poses (flying, jumping, etc.). Playing around with these models has been a lot of fun and practice.

UNDERSTAND WHAT YOU’RE DOING
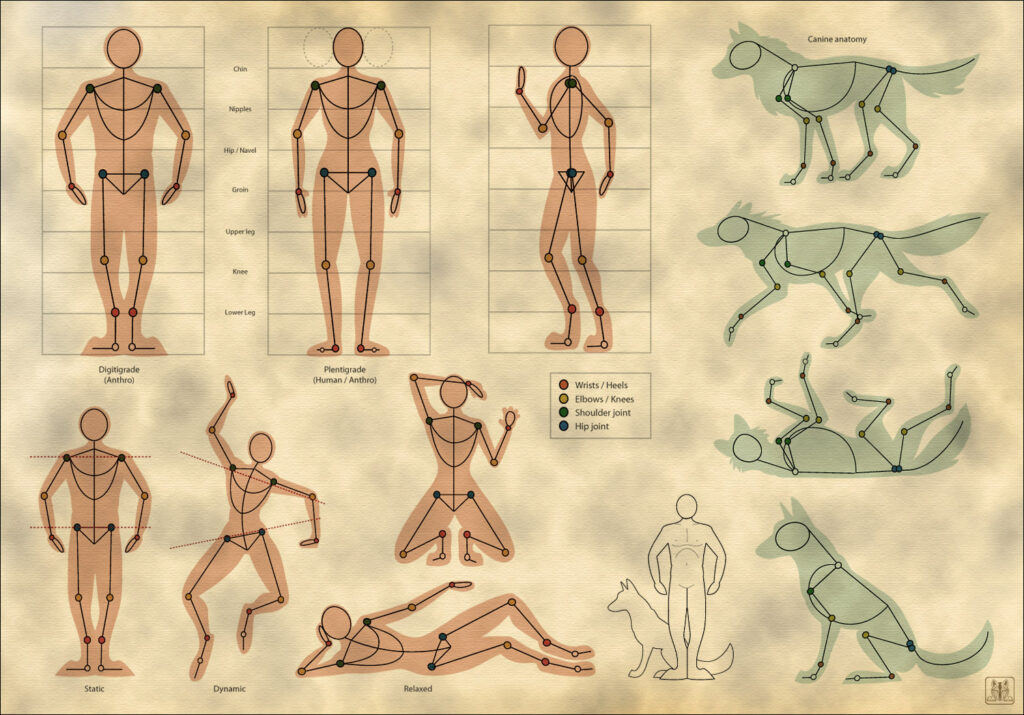
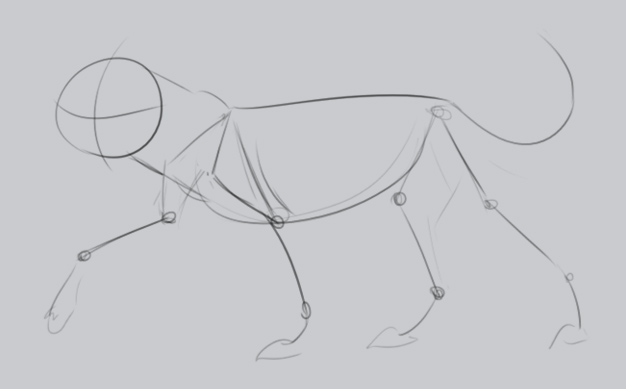
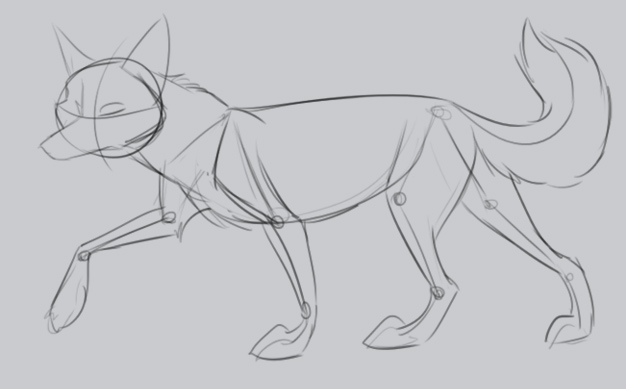
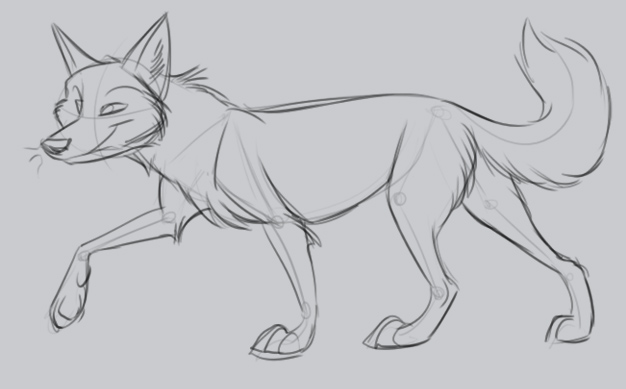
The most important thing is to understand what you’re doing. Don’t try to blindly redraw (trace) pictures without understanding what you’re drawing, otherwise you may also copy (and learn) mistakes. You don’t need to be a medical anatomy expert, but for the beginning you should learn about the basic skeleton (and muscles) and how a body works. In order to draw a character moving or posing right, you need to know where the joints are. The better you understand something, the better you will be able to reproduce / draw it, also in different poses.
HOW TO START
You may have the urge to get a result as fast as possible, but if you rush at the beginning, you will regret it at the end when you’ve put much work into details/coloring, but didn’t take the time to get the anatomy look right first. Take your time to make your sketch look right, even if this means that you’ll sleep a night over it (especially if you’ve been working on a sketch for a long time, this sometimes helps to discover mistakes when looking at the picture with a fresh, resetted view the next day).
When drawing a character, I usually start with very simple basic shapes (circles, lines) to construct a character and define the pose. This little “wire skeleton” in my head helps me to find a pose. For the head circle, I add a cross which defines in which direction the character will be looking into. Often I do several of those rough sketches, to warm up, and to find the pose that I want. When my rough construction looks good to me, I continue giving the forms some more detail. Only when I am content with the basic construction, I start adding details, fur, etc.
PLAN YOUR COMPOSITION
Especially when you have to work with a limited space / a fix paper size (e.g. in a sketchbook), it’s recommended to sketch a very simple construction of the drawing (for example just lines and circles), to position the characters on the picture. That way you can find out at the beginning if it will fit on the limited space, before putting too much detailed work into it.
It can be very frustrating when you start a nice sketch and then realize you have to end it with an awkward pose or cut of the legs because the paper is too small. When sketching digitally, this is not so much of a problem as you can simply move or scale your drawing or expand the canvas.
CONCEPT SKETCHES
When doing bigger pictures (more detailed/complex, with background, etc.), I don’t just simply start somewhere, but I usually do little concept sketches first. That way you can define the composition, positions in the picture, light sources and shadows, what’s in the background, the basic color scheme, etc. Usually I am doing this digitally and often change a lot until I am happy with the layout. Once I am happy, I start doing the actual sketch and coloring and use my concept sketch as reference.
HOW TO DETECT MISTAKES – RESET YOUR EYES
Especially when you’re working on a picture for a longer time, you may start getting “blind” to mistakes. So when sketching, it’s recommended to take a break once in a while (give your eyes and brain some rest, maybe sleep a night over it), and then get back to your picture – you will suddenly notice mistakes that you haven’t seen before. But not only for sketching, also when coloring it’s useful to take breaks and “reset” your view.
HOW TO DETECT MISTAKES – THE MIRROR TRICK
Another very useful trick you can use right away to figure out anatomical mistakes is looking at your picture mirrored – either in a mirror, holding it against a window or putting it on a light table (depending on how heavy the paper is), or if you’re working digitally, just flip the picture horizontally. You will be surprised how a picture that looked alright suddenly shows anatomical mistakes when you flip/mirror it.
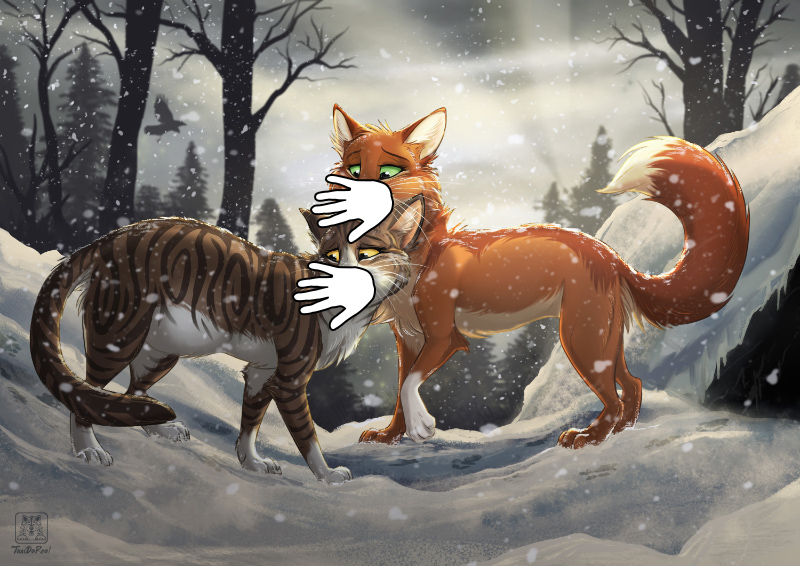
HOW TO DETECT MISTAKES – COVER AREAS
Sometimes something looks wrong (for example eyes or muzzle) but you cannot tell what. What I found out for myself – I can sometimes detect perspective or anatomical mistakes by covering a part of the image for a while.
Example:
I think there’s something wrong with the muzzle, so I cover it and just look at the eyes. Do they look fine to me (size, position, perspective)? If yes, then they are probably not the problem. Then I imagine what the muzzle would look like correctly in this position. I kinda build/complete the image in my head. Then I uncover the muzzle, and sometimes it blows my mind how wrong it looks (compared to the “correct” image in my head). This also works for other checks, for example if a character is looking properly at you, or is cross-eyed.
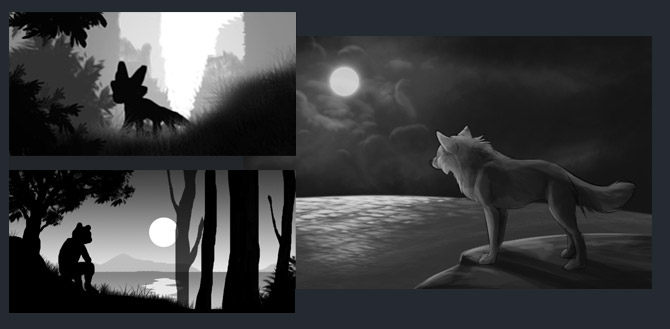
CHECK THE VALUES
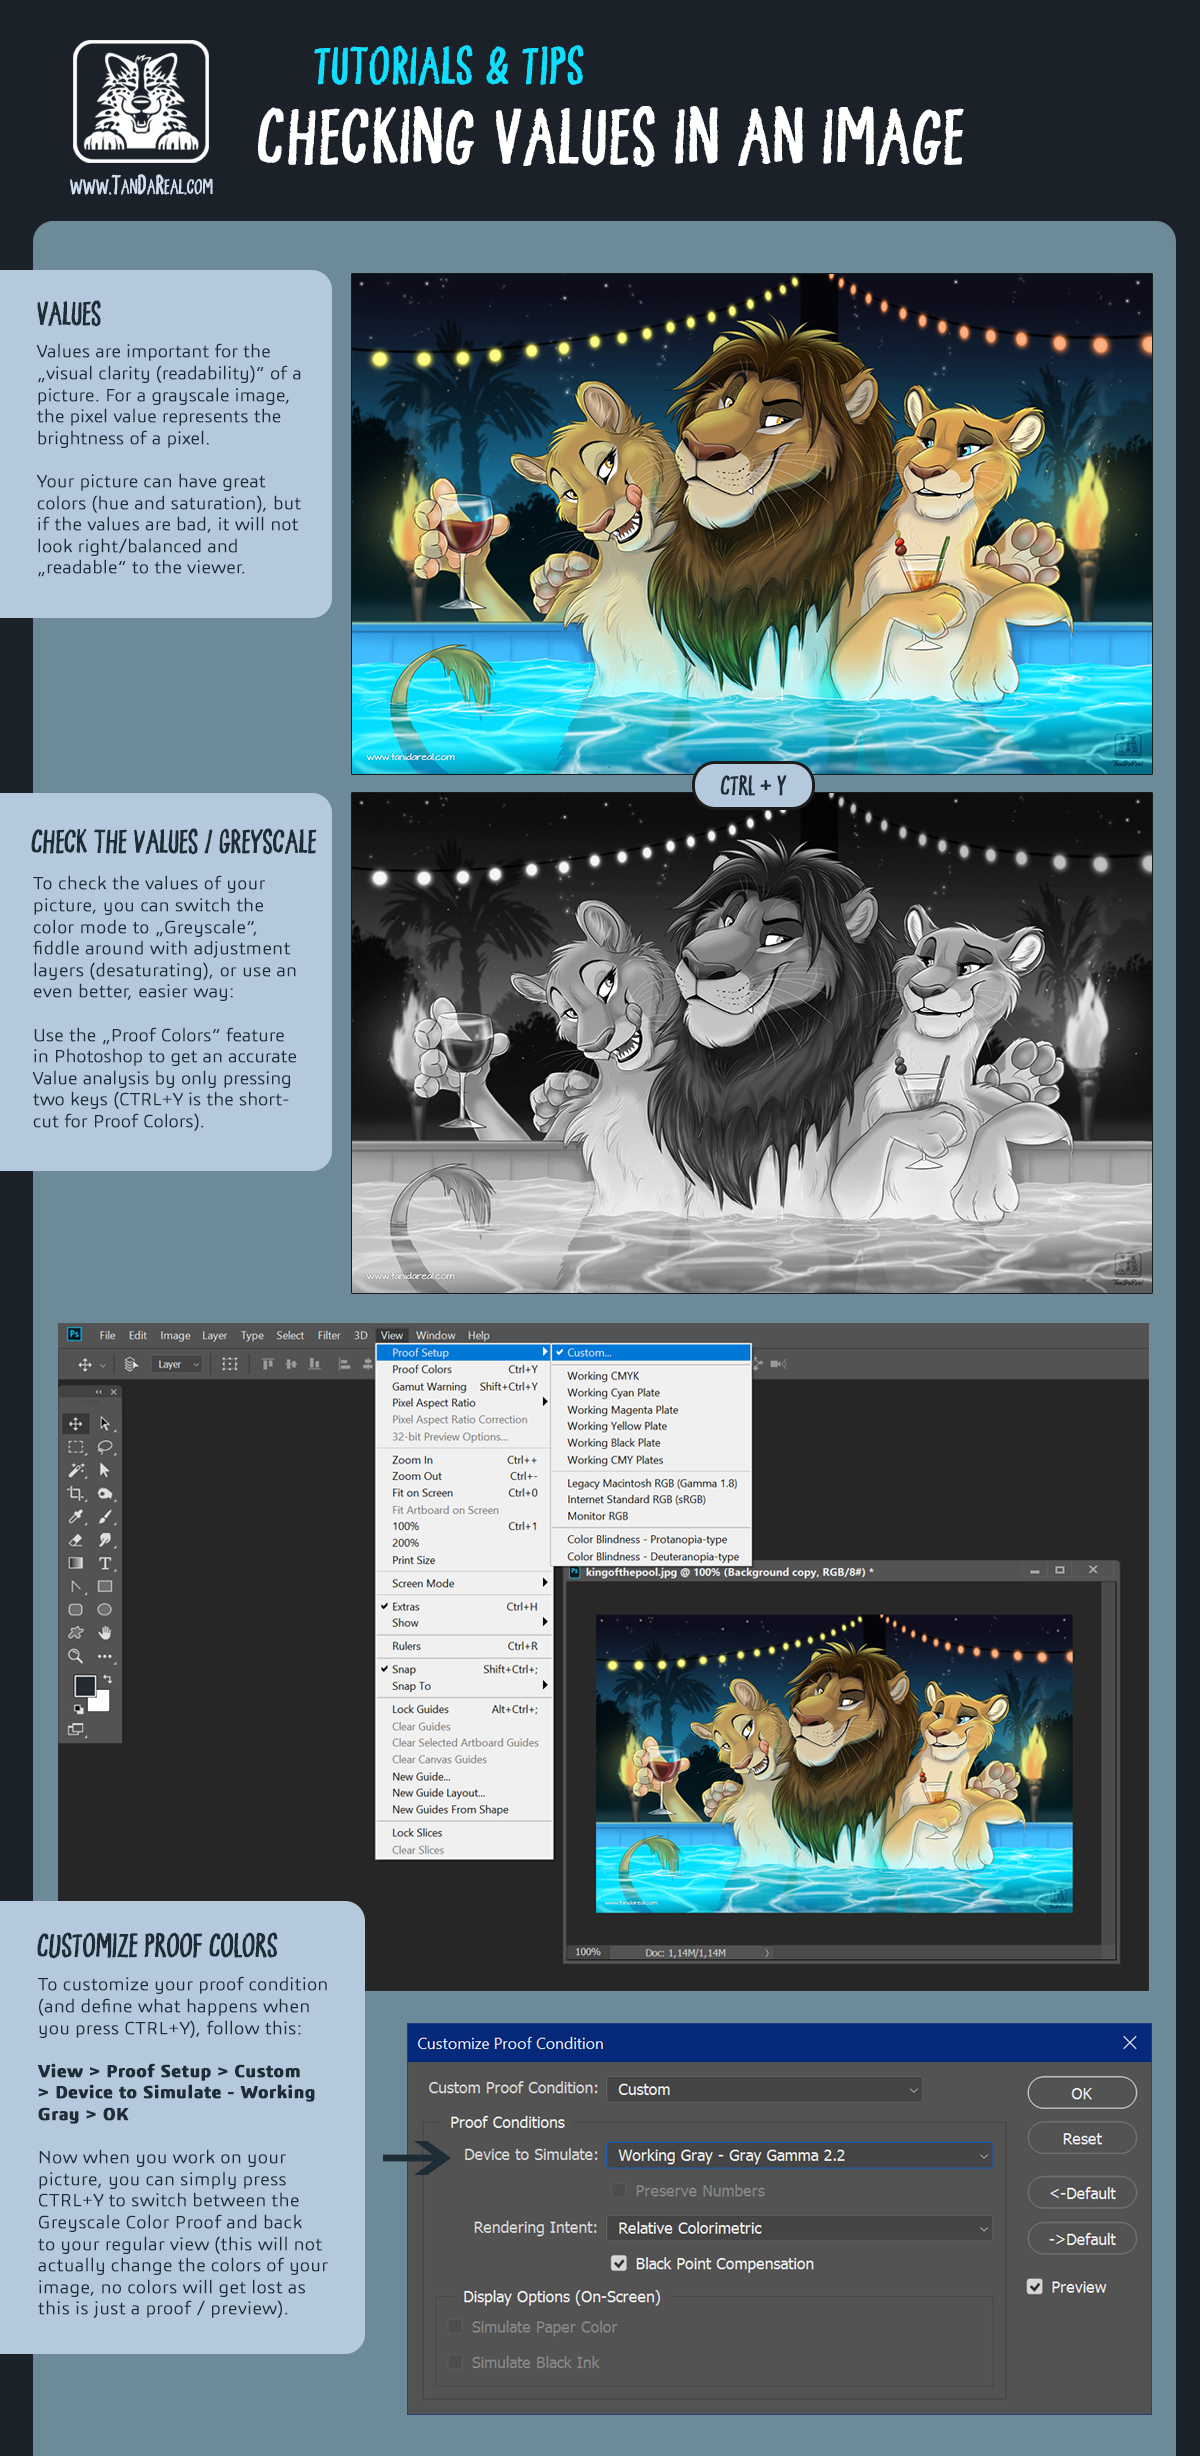
If a picture looks fine color-wise, but still not right or somewhat distracting, there may be something wrong with the values. Values are important for the visual clarity / readability of a picture (for a greyscale picture, the pixel value represents the brightness of a pixel). Basically: you remove the colors and check your picture for brightness, contrast, shadows.
There is an easy, elegant way in Photoshop to proof the values of your artwork: “Proof Colors”, which allows you to switch between your regular view and the color proof (greyscale) by simply pressing CTRL+Y, without actually changing the colors of your file.
Click here to see the image / tutorial.
TUTORIALS AND BOOKS
There are very nice drawing books and online tutorials, explaining step by step how to draw (anatomy, perspectives, proportions, light/shadows, digital drawing techniques, working with water colors, etc.). Even if you’re an experienced artist, you never stop learning, there is always room for improvement. I have listed some useful links and recommendations here.
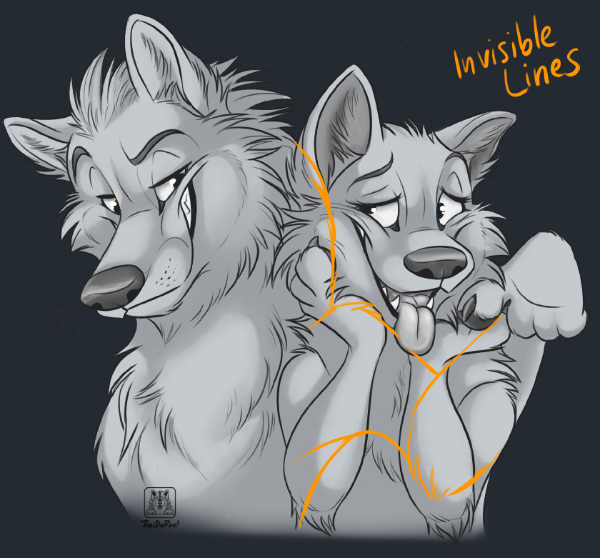
INVISIBLE LINES
Pictures always have “invisible lines” – parts that are fully or partially hidden behind other things or characters due to perspective (this can be an arm behind someone or parts hidding behind clothing for example).
So when you sketch one or multiple characters, don’t hesitate to scribble these hidden lines as well for the first rough sketch (or at least draw them in your head).
If you simply add outlines somewhere (e.g. a hand that appears on a shoulder, while the arm is hidden behind the character) without checking where they come from, your picture might look off (like wrong proportions, body parts just attached somewhere or looking like broken bones).
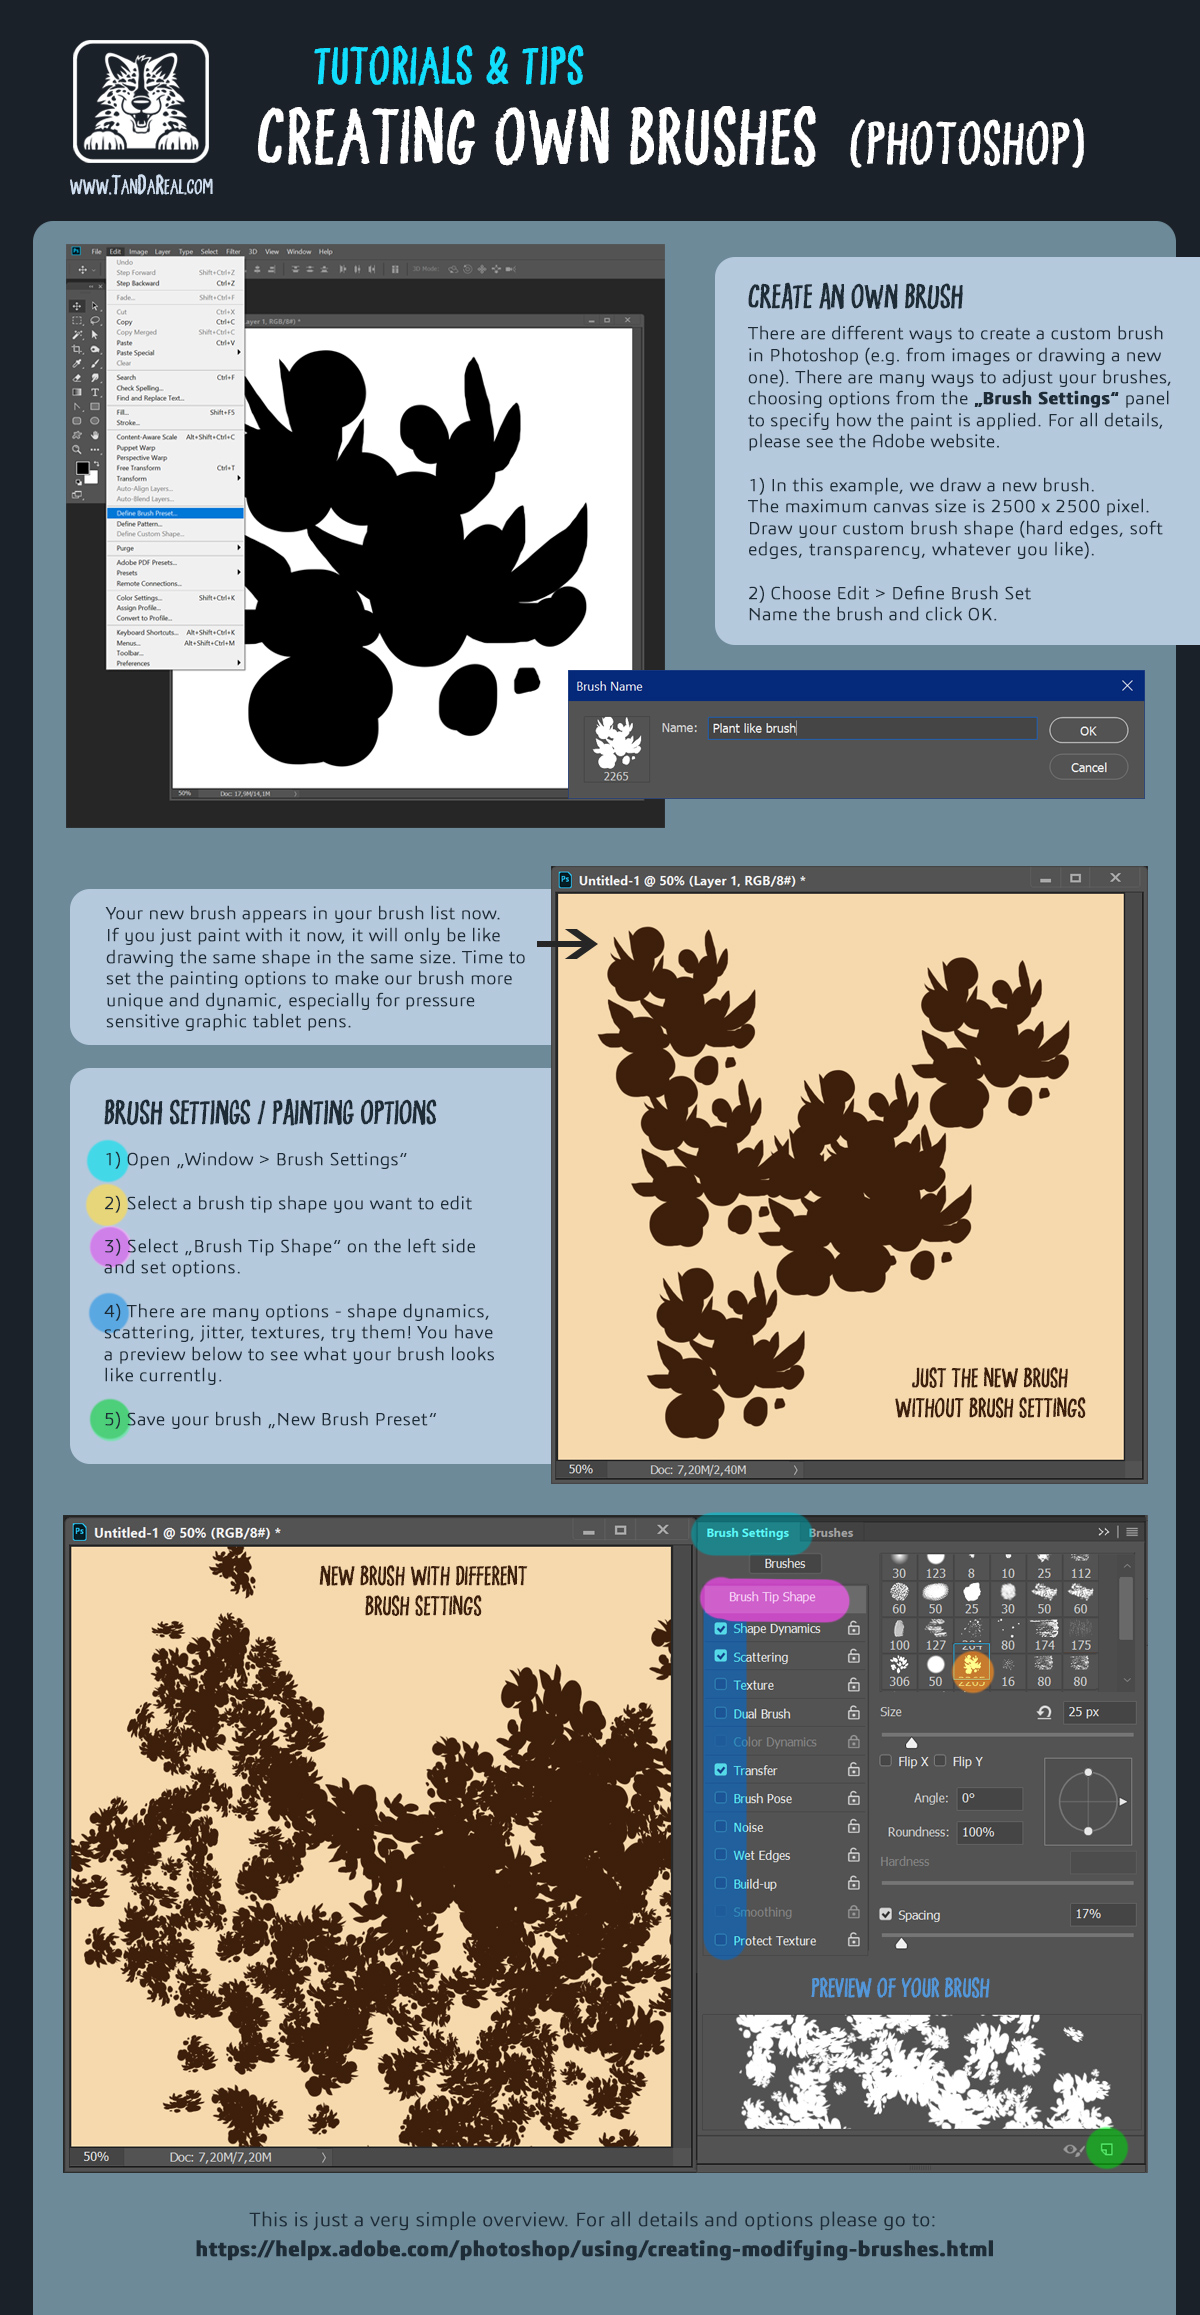
DARE TO TRY OTHER BRUSHES/MATERIAL
Maybe you’re having a hard time with something, for example drawing clean outlines. Dare to try new brushes or another drawing program. Maybe there’s something better that makes your life easier and your result better. Don’t stick with something just because you’re used to it or always have done it like that. For example, the feeling of drawing smooth outlines in Clip Studio Paint Pro does feel a lot different than drawing them in Photoshop. Or the different brushes in Photoshop make a huge difference how drawing lineart (or coloring of course as well) feels, and how the results look like.
I usually have a favorite collection of brushes that I update when I find a good new brush (I bought a lot of them on Grutbrushes or Aaron Blaise) or make one myself. Always remember to make backups of your brush presets! Come to my useful links page where you can get brushes.
Another way is to create brushes yourself. Here is an example how to do it in Adobe Photoshop:
PAY ATTENTION TO DETAILS
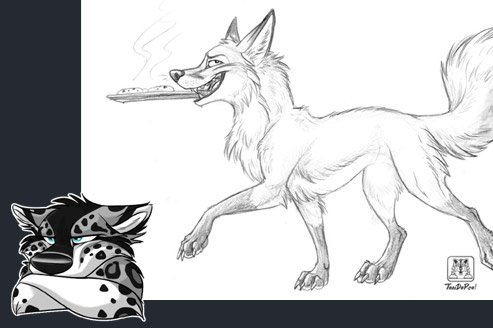
Take a look at details and understand the differences between species/breeds when drawing animals. A cheetah’s anatomy looks totally different to a tiger’s, a snow leopard is not just a regular leopard with grey fur, a fox does not look like a wolf, canine paws do not look the same like feline paws, not every big cat nose looks the same, a bunny does not have pawpads, a coyote howls different than a wolf. Especially when drawing in a realistic style, it is very important to pay attention to these details.
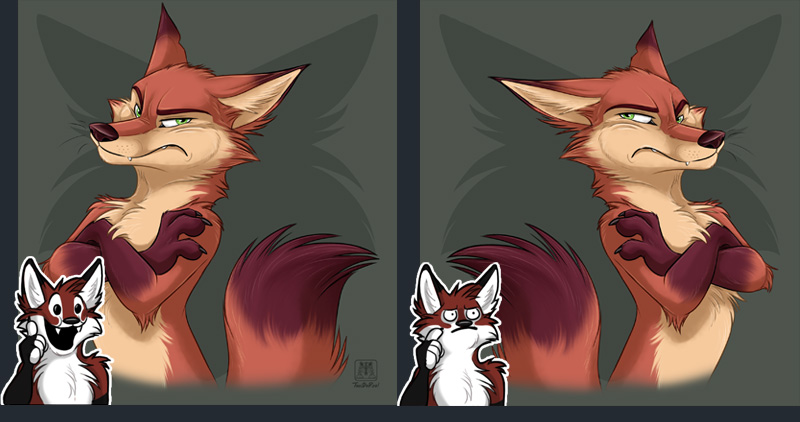
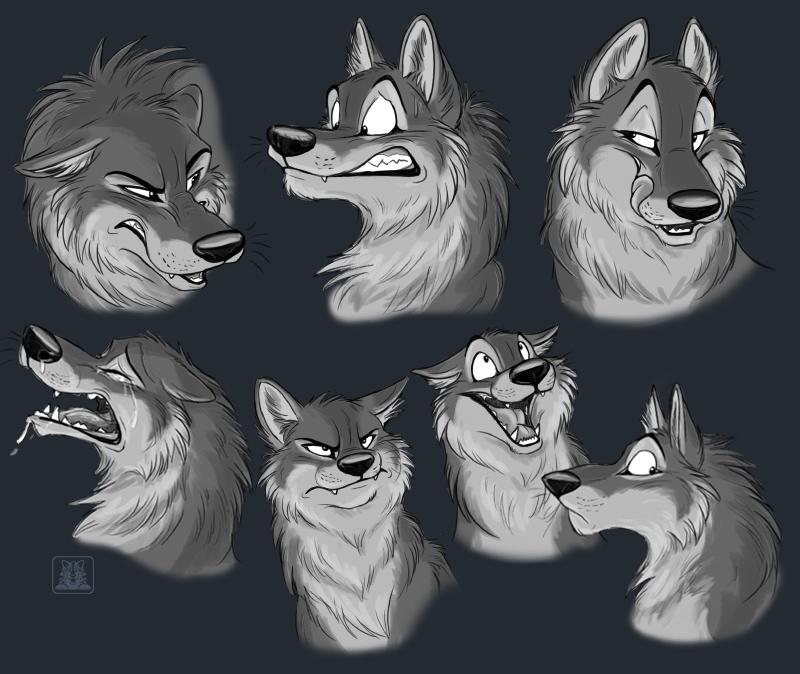
FACIAL EXPRESSIONS
I am a big fan of facial expressions to bring a character to life, to express feelings, to show emotions or the nature of a character. Of course there are styles where this is not as important/intense (like realistic animal portraits), but especially for toony pictures, this is essential. It’s a matter of style, so it’s totally up to you how realistic, natural or exaggerated you like to draw an expression. Also here, use references – or even more simple: take a look at yourself in the mirror. Make different faces, watch your expressions, how does your mouth move, how does the shape of the eyes change when looking angry, happy, sad… be your own model to understand facial expressions.
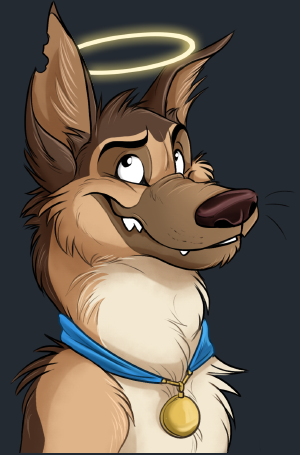
CHALLENGES
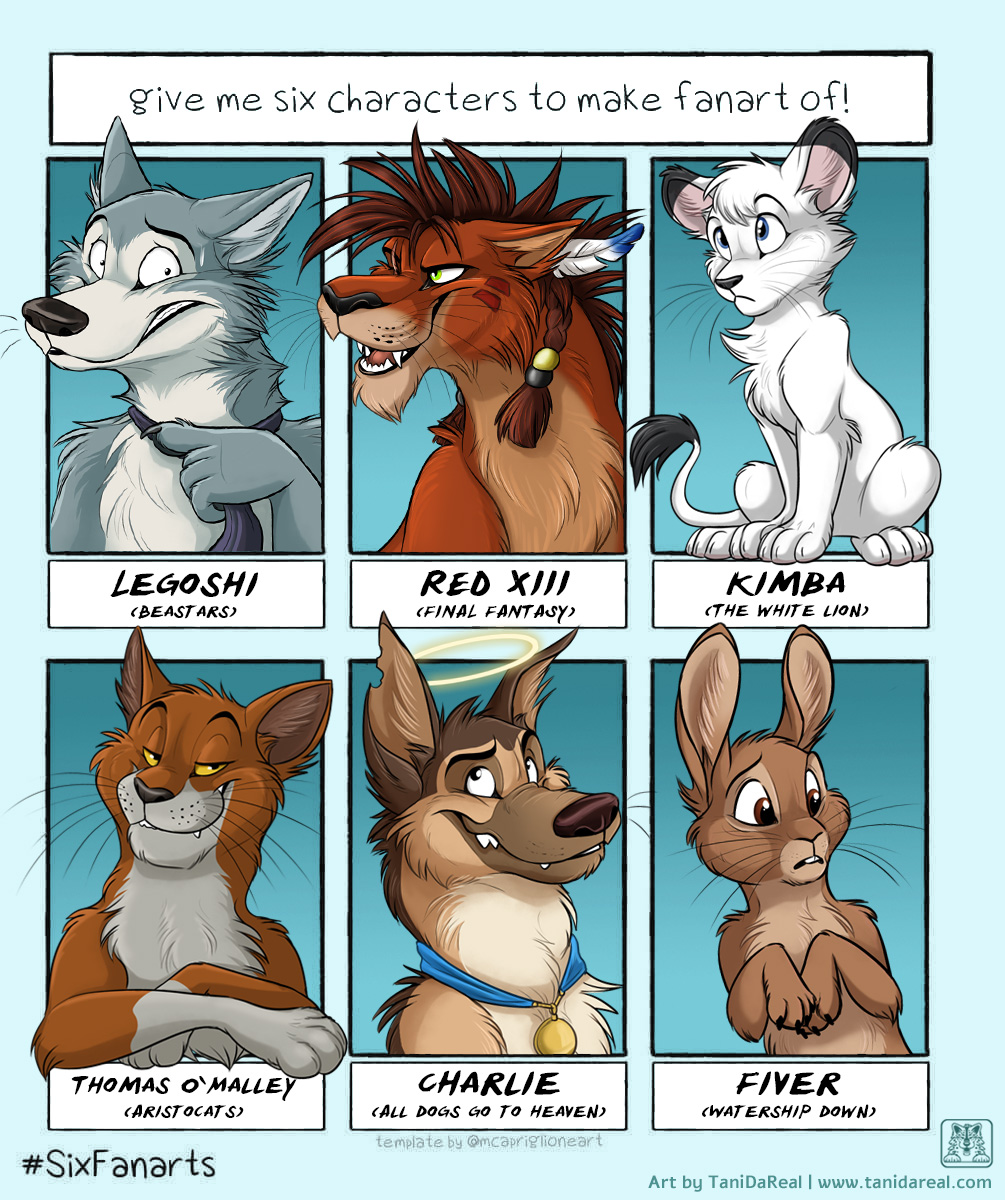
I once in a while enjoy facing a challenge to try something new. Usually Twitter etc. provide a lot of memes or challenge ideas, like drawing something in a certain style, drawing fanart of suggested characters, drawing something every day of a certain month, etc.
For the example on the right, people could suggest characters you should draw fanart of. I very much enjoyed that one, mixing my own style with the look and style of the original characters.
ASK FOR FEEDBACK / ADVICE
Don’t hesitate to ask for feedback. Show your sketch to other artists, let them give you critique, advice, maybe some redlines. Ask for honest feedback, it doesn’t help you if a friend doesn’t want to be “mean” and only tells you nice things (although he knows there are things wrong with the picture). When you’re in the position to give somebody feedback, try to give constructive critique. “It looks wrong” may be correct, but this doesn’t really help when the artist doesn’t know what.
Don’t be disappointed if an artist doesn’t have time for giving you detailed feedback (many of them are very busy). It may help to ask for a specific feedback, for example it will be easier for an artist to answer the question “could you please tell me if the anatomy looks right?” rather than “can you teach me how to draw?” or “what do you think?”
YOU NEVER STOP LEARNING – LOOK AT YOUR PROGRESS
There is always room for improvement, even for experienced artists. When looking back at older art, you should be able to see a progress. If you look back at older art and don’t see any improvement, there’s something wrong. Keep your old pictures and look at them once in a while, seeing your improvements can be quite motivating (and entertaining as well). It’s also fun to redraw an old picture in your current style and skills to see the improvement.
The right material / equipment
Real media – Choose the right drawing material. Like using the right kind of ink for outlining or the right type of paper for water colors or markers to avoid bleeding or wrinkling, etc.
Digital art – If you draw digitally, I very much recommend getting a graphic tablet. What different tablets there are and what may be the right one for you, you can look up here in the graphic tablets section. If you’re looking for good drawing programs, you can look them up here.
PRACTISE, PRACTISE, PRACTISE
Maybe not the most satisfying advice, but surely the truest one. Everybody started small, even your biggest role models.
Keep yourself motivated to draw on a regular basis, stay challenged, without putting too much pressure on yourself.
It goes without saying that motivation and inspiration will make it much easier to practise frequently, that’s why I added a separate section for motivation tips. Creativity is like a muscle, it needs and wants to be trained. If you’re doing several sketches in a row, you may notice that it will get smoother and easier from sketch to sketch.